Once you download the WanderSafe app its important to set it up properly so that you can enjoy the maximum benefits of all the amazing features. In this post you’ll learn how to add and confirm your emergency contacts in the WanderSafe app and why it is important that your emergency contacts confirm by downloading the WanderSafe app.
Here are the steps to take to setting up the emergency contacts in the WanderSafe app properly.
1. Download the WanderSafe app and go through the setup process. You can access it in the Play store and iTunes for iphone users with operating systems from 10.1
2. Complete the onboarding process including confirming your smartphone’s phone number via the autogenerated SMS code. Note, the code will come from a +1 615 area code exchange as we use a third party service to deliver our SMSs.
3. Select three people in your tribe that would be willing to help you get help or come to your aid if you were in peril. We suggest a loved one, living partner or traveling colleague and your boss if using the WanderSafe app and beacon as a part of your employer Duty of Care program at Booking.com, Revlon, Deloitte Digital, and Vantage Strata. Ensure that the number you use to add them with is able to receive an SMS text message and it is not their land-line.
4. If using IOS, be sure and find your contacts via the scroll feature, instead of the SEARCH feature. For some reason, IOS does not let you add a contact by tapping the bubble on the left of the contact in your friends list if you SEARCH instead of SCROLL.
5. Each person that you select will get a notification that you have nominated them to be your emergency contact and get prompted to download the app. It is not mandatory for you to use the app and beacon successfully, but it greatly improves their ability to track you should you activate the WanderSafe SOS Alert feature as this is best viewed in the WanderSafe application. If you the user were to activate the WanderSafe SOS feature either with a beacon or in the app interface, they are able to track your movements using the technology we have built.
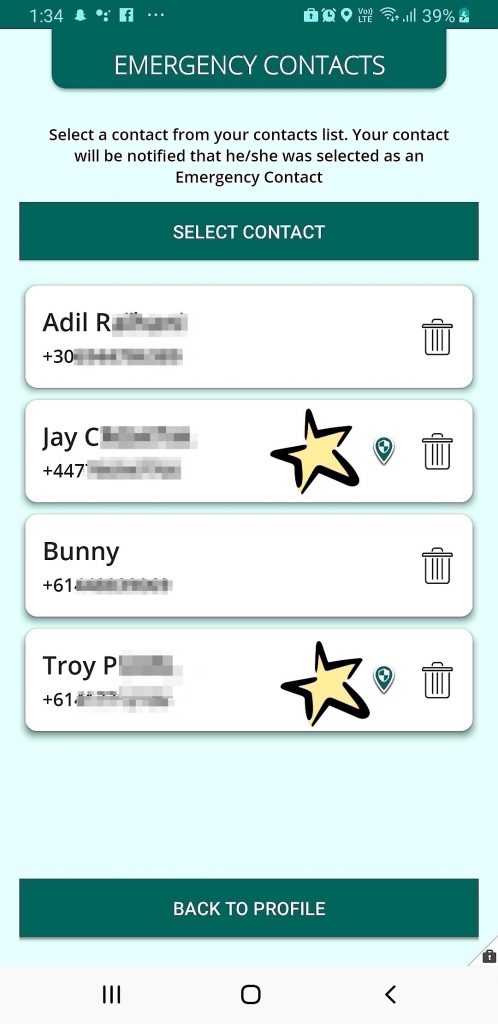
6. Once your WanderSafe Safety Circle members have downloaded and confirmed themselves in the app, you can see their confirmation in your Emergency Contacts screen. Their names will have the WanderSafe SAFE Icon next to them and you have successfully set up this feature.
Got a question or suggestion for the WanderSafe app? Please let us know in the comments below.


5 thoughts on “How to Add and Confirm Emergency Contacts in the WanderSafe App”
Hi I am trying to create profile for the wander safe app.i can put my name town and how do I do the next step. Won’t click to another
Hi there; make sure that you have your location features on in your handset first. Then type in the nearest city and state where it requests and hit return. The map (we use Google) should search and locate and then suggest you verify your phone number. Type in your area and country code. You will receive a validation code which will confirm your phone number is yours. Please email us at paulo at jozuforwomem.com if there continues to be an issue. We are here to help. 🙂 #SaferTogether
I’m a nominated safety person and I’ve downloaded app but can’t work out how to confirm? Help
HI Tash- When the user has downloaded and set up the app, the confirmation for you is that there is a small blue icon next to their name and number in your emergency contact screen. That symbol by their name is the confirmation that if you activate SOS, that your Tribe member can follow you in the app and see where you are in need of assistance. Once you have downloaded and installed the app, your friend/loved one should be able to see the blue icon next to your name. Let us know if you need more help! – Stephenie
PS. We also highly recommend that you nominate three emergency contacts so that you can use the app’s free SOS Alert protocol if you need help or are in trouble. The voice assist feature in SIRI shortcuts and Google Assist are really cool to set up as well.